Science Fair Projects
4. Designing a Science Fair Display
Learning outcomes
- I can organize information into a clear display.
- I can design effective graphs, diagrams, and visuals.
- I can communicate scientific ideas clearly.
- I can present information in a logical sequence.
- I can create an attractive and informative display.
Designing a Science Fair Display
A science fair display is more than decoration. It is a visual scientific report that allows someone to understand your investigation without reading a long research paper or listening to your entire presentation.
A strong display should quickly answer several questions:
- What did you investigate?
- Why did you investigate it?
- What did you predict?
- How did you conduct the investigation?
- What data did you collect?
- What patterns did you find?
- What did you conclude?
- How reliable were your results?
The best displays combine clear scientific information, logical organization, effective visuals, and an attractive design.


The Purpose of the Display
Your display should communicate the story of your investigation.
A visitor should be able to begin at the title, move through the investigation, examine your evidence, and finish with your conclusion.
A useful overall sequence is:
Question → Background → Hypothesis → Method → Results → Analysis → Conclusion → Evaluation
This follows the same general order in which the scientific investigation developed.
The display should not force the reader to guess where to look next.
Start with a Clear Title
Your title is usually one of the first things visitors notice.
It should be:
- large
- easy to read
- relevant to the investigation
- reasonably short
A title can be straightforward.
For example:
How Temperature Affects Sugar Dissolving Rate
or:
The Effect of Ramp Height on Toy-Car Speed
A title such as:
My Science Fair Project
does not tell the reader what the investigation was actually about.
Your title should immediately communicate the main scientific idea.
Organize Information Logically
A science fair board is often divided into sections.
A possible organization is:
Left section
- Background Information
- Research Question
- Hypothesis
- Variables
Centre section
- Title
- Method
- Photographs or diagrams
- Results
- Main graph
Right section
- Analysis
- Conclusion
- Evaluation
- Improvements
- References
This is only one possible arrangement.
The important idea is that the sections should follow a logical sequence.
A reader should not have to jump randomly from one side of the board to another.
Create a Visual Hierarchy
Not every piece of information should look equally important.
A visual hierarchy guides the reader toward the most important information first.
Usually:
Title — largest text
Section headings — large and clearly visible
Body text — smaller but easy to read
Graph and diagram labels — large enough to read comfortably
Important results or conclusions can also be emphasized.
This helps the viewer understand the structure of the display before reading every word.
Avoid Too Much Text
One of the most common science fair display problems is trying to place the entire written report on the board.
A display is not supposed to be a wall of paragraphs.
Instead of this:
The experiment was conducted using five different ramp heights and each height was tested three times in order to obtain sufficient data. The car was released from exactly the same location during each trial and the time required for the car to travel one metre was measured...
A display could communicate the same information more efficiently:
Method
- Tested 5 ramp heights
- Used the same toy car and ramp
- Released car from the same point
- Measured travel time over 1.0 m
- Completed 3 trials at each height
- Calculated the average time
The second version is easier to scan quickly.
Use White Space
You do not need to fill every centimetre of the display.
Empty space between sections is called white space or negative space.
White space helps:
- separate sections
- reduce visual clutter
- make text easier to read
- draw attention to important information
- make the display look more organized
A board packed from edge to edge can make excellent scientific work look confusing.
A good rule is:
Do not ask, "How can I fill this space?"
Ask:
"Does this information help communicate my investigation?"
Make the Research Question Easy to Find
Your research question is one of the most important parts of the display.
For example:
How does the height of a ramp affect the average speed of a toy car?
Someone viewing the display should be able to find the question almost immediately.
The rest of the display should connect directly back to this question.
Your:
- hypothesis
- variables
- method
- data
- graph
- conclusion
should all relate to answering it.
Include the Variables
Clearly identify:
Independent variable — what you deliberately changed
Dependent variable — what you measured
Control variables — important factors kept constant
For example:
Independent variable: Ramp height
Dependent variable: Travel time
Control variables:
- same toy car
- same ramp
- same surface
- same travel distance
- same release point
This helps the viewer understand how the investigation was designed as a fair test.
Use Photographs Effectively
Photographs can be very useful when they actually communicate something about the investigation.
Useful photographs might show:
- experimental setup
- measuring equipment
- different experimental conditions
- samples being tested
- changes observed during the investigation
- final products or results


A photograph should have a purpose.
Instead of including ten nearly identical photographs of a plant, you might include:
- initial plant condition
- experimental setup
- comparison between treatments
- final plant condition
A short caption can explain what each photograph shows.
For example:
Bean seedlings after 14 days under different light conditions.
Use Diagrams When Photographs Are Not Enough
Sometimes a diagram communicates an experimental setup better than a photograph.
A photograph may contain distracting background objects or make equipment difficult to identify.
A simple experimental diagram can clearly show:
- equipment arrangement
- direction of movement
- distances
- measurement locations
- important components
For example, a ramp experiment diagram might show:
release point → ramp → start line → 1.0 m measurement zone → finish line
Diagrams should be:
- simple
- clearly labelled
- large enough to read
- scientifically accurate
Do not add decorative details that make the scientific information harder to understand.
Tables Show the Actual Data
A results table allows viewers to see the measurements you collected.
For example:
| Ramp height (cm) | Trial 1 (s) | Trial 2 (s) | Trial 3 (s) | Average time (s) |
|---|---|---|---|---|
| 10 | 2.84 | 2.79 | 2.81 | 2.81 |
| 20 | 2.31 | 2.28 | 2.33 | 2.31 |
| 30 | 1.97 | 2.01 | 1.95 | 1.98 |
| 40 | 1.76 | 1.72 | 1.75 | 1.74 |
A good table should include:
- descriptive headings
- units
- consistent decimal places when appropriate
- clearly organized values
However, tables are not always the easiest way to see a pattern.
That is where graphs become especially useful.
Graphs Tell the Story of Your Data
A good graph can communicate an important result in seconds.
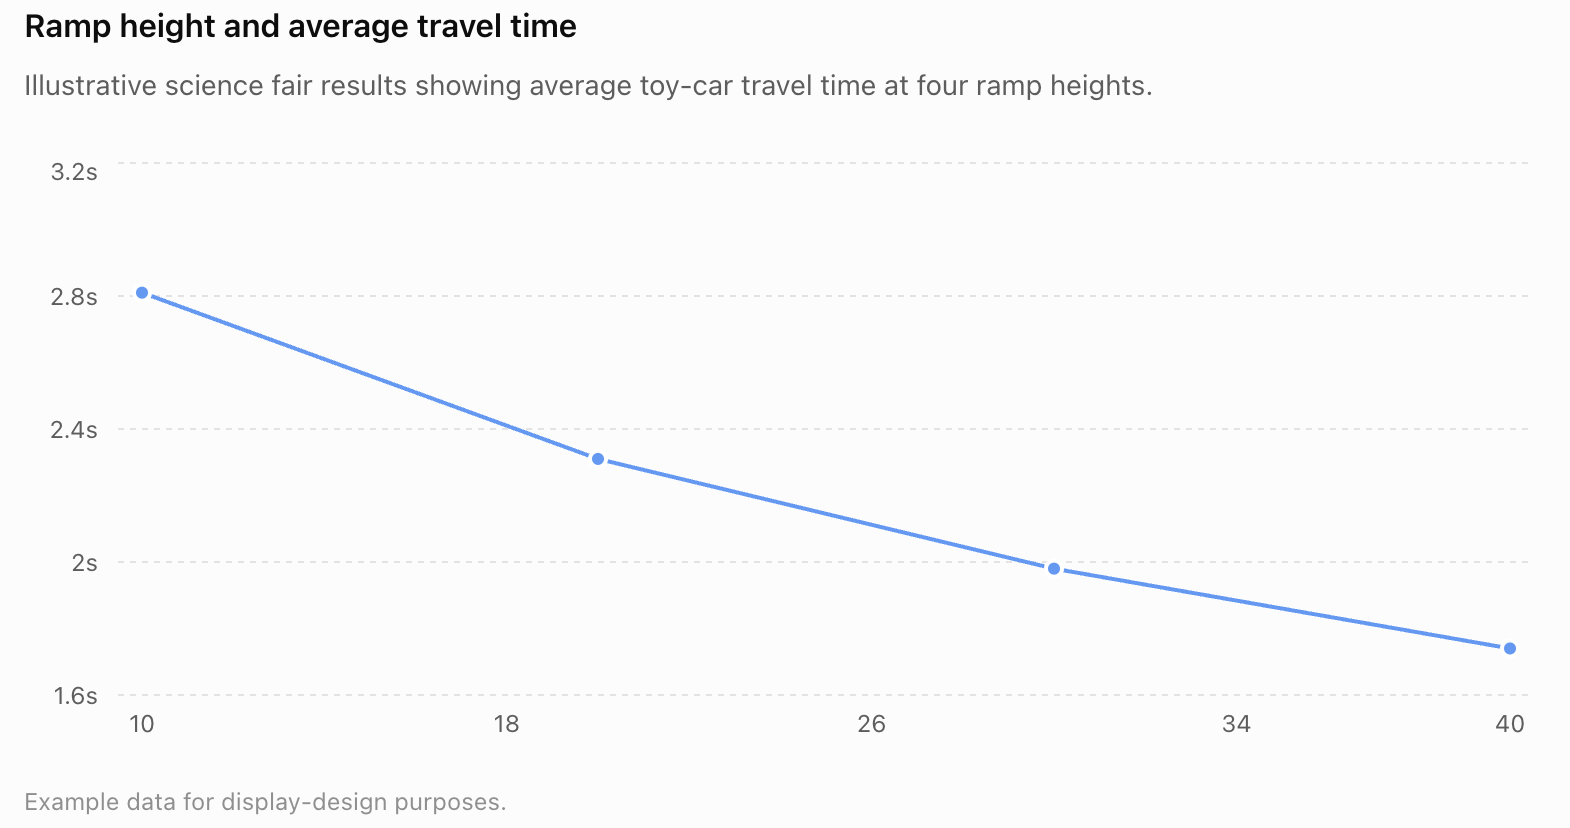
Suppose the ramp investigation produced the example data above.
A graph makes the relationship between ramp height and travel time much easier to see than the table alone.
When designing a graph, include:
- a descriptive title
- clearly labelled axes
- units
- appropriate scales
- accurately plotted data
- a suitable graph type
The independent variable normally goes on the horizontal x-axis.
The dependent variable normally goes on the vertical y-axis.